「Git」:修訂間差異
出自DILA Wiki
imported>Ray 無編輯摘要 |
imported>Ray |
||
| 行 9: | 行 9: | ||
=從 Remote Repository 複製(clone) 一份到 Local Repository= | =從 Remote Repository 複製(clone) 一份到 Local Repository= | ||
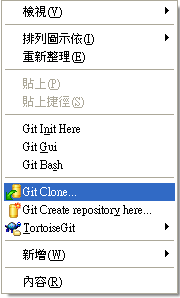
開啟檔案總管, 選取您要將 Local Repository 放在哪裏, 然後按右鍵, 出現如下圖 | 開啟檔案總管, 選取您要將 Local Repository 放在哪裏, 例如 D:\, 然後按右鍵, 出現如下圖<br> | ||
[[ | [[ 圖片:Git_Clone.png]]<br> | ||
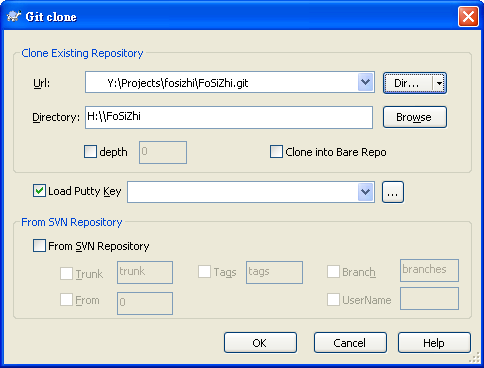
按「Git Clone」出現如下圖: | 按「Git Clone」出現如下圖:<br> | ||
[[ | [[ 圖片:Git-clone2.png]]<br> | ||
第一欄 Url 要放 Remote Repository 的位址, 可以按右邊的「Dir」按鈕選擇資料夾, 例如佛寺志的 Remote Repository 是在 Y:\Projects\fosizhi\FoSiZhi.git | 第一欄 Url 要放 Remote Repository 的位址, 可以按右邊的「Dir」按鈕選擇資料夾, 例如佛寺志的 Remote Repository 是在 Y:\Projects\fosizhi\FoSiZhi.git<br> | ||
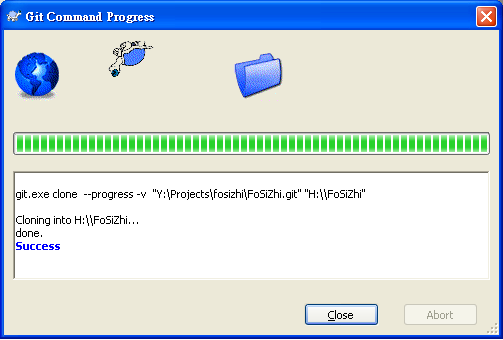
第二欄 Directory 是 Local Repository 的位址, 確認正確後, 按「OK」, 它會開始進行 Clone, 成功後出現如下圖: | 第二欄 Directory 是 Local Repository 的位址, 確認正確後, 按「OK」, 它會開始進行 Clone, 成功後出現如下圖:<br> | ||
[[ | [[ 圖片:Git-clone3.png]] | ||
=日常作業流程= | =日常作業流程= | ||
於 2011年5月23日 (一) 10:09 的修訂
安裝、設定
- 下載並安裝 msysgit 的最新版本
每一個步驟都選擇預設值就可以了. - 下載並安裝 tortoisegit 的最新版本
- 設定
- TortoiseGit => Settings => Git => Config
- 填寫 Name、Email 欄位 (請填寫足供辨識的完整姓名, 例如 Ray CHOU, 而不只是填ray) => 確定
從 Remote Repository 複製(clone) 一份到 Local Repository
開啟檔案總管, 選取您要將 Local Repository 放在哪裏, 例如 D:\, 然後按右鍵, 出現如下圖

按「Git Clone」出現如下圖:

第一欄 Url 要放 Remote Repository 的位址, 可以按右邊的「Dir」按鈕選擇資料夾, 例如佛寺志的 Remote Repository 是在 Y:\Projects\fosizhi\FoSiZhi.git
第二欄 Directory 是 Local Repository 的位址, 確認正確後, 按「OK」, 它會開始進行 Clone, 成功後出現如下圖:

日常作業流程
- 在 working directory 做編輯更新
- pull: 從 Remote Repository 捉最新的資料到 Local Repository
- commit: 將 working directory 裏所做的更新提交到 Local Repository
- push: 將 Local Repository 上傳到 Remote Repository
取得以前的某個版本
- 在整個專案資料夾上按右鍵 => TortoiseGit => Show log
- 選擇想要的版本 => 按右鍵 => Create Branch at this version
- 輸入 branch 名稱 (自己可以訂)
- 切換到該 branch: TortoiseGit => Switch/Checkout
刪除某個 branch
Git GUI => Branch => Delete